Introduction
We are assuming that both geth and puppeth have been successfully installed and added to the system path.
In this tutorial we are going to see:
- how to setup a two node Blockchain using a POA consensus algorithm
- how to interact with the command line geth console
- how to use Metamask to interact with our private node
- how to attach Remix to the desired node
A two-node Private Chain Setup
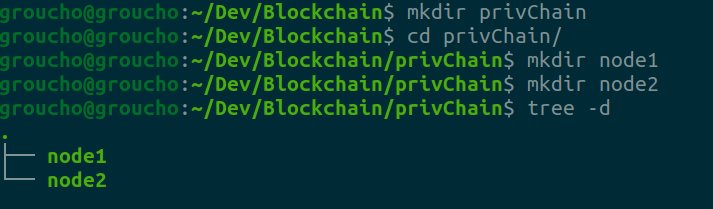
As our first step we create two empty folders that will contain the blockchain data
We are going to use the Clique POA consensus algorithm that allow us to choose specific accounts that are entitled to seal new blocks. Being it private we will prefer the word sealing to the one of mining, being used for public chains. Therefore with such a term we will refer to the ability of adding new blocks to the chain and the accounts responsible for that will get the name of validators.
In our example we just want one validator.
For explanatory convenience, we decide the validator to be the first account we create in node1.Therefore none of the newly created addresses in node1 or in others should be entitled to add new blocks.
We use geth to create two addresses, one for each node.
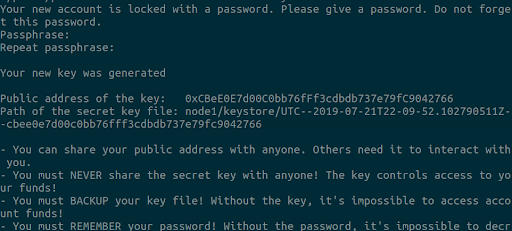
The following command will allow us to create an account and store all the configuration inside node1/keystore:
geth --datadir node1 account new
This will ask us to choose a password in order to continue. The password is used for the computation of our private key. Therefore with we are going to lose it, we will not have a way to retrieve our private key.
We then do the same for the second node.
geth --datadir node2 account new
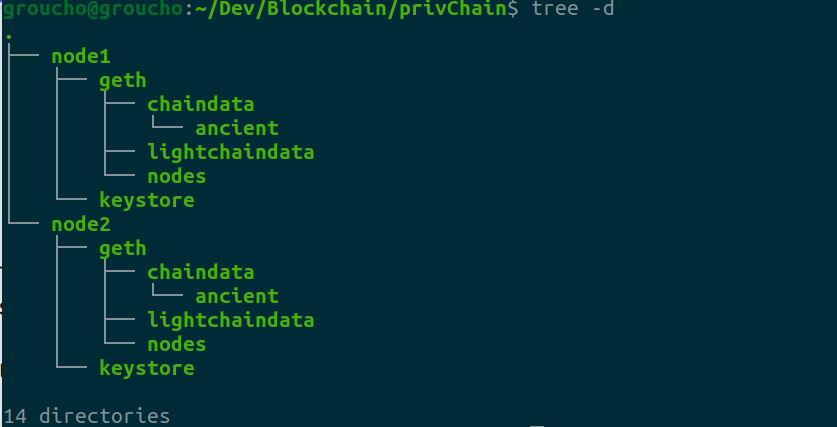
At the end we should see the following files’ tree structure
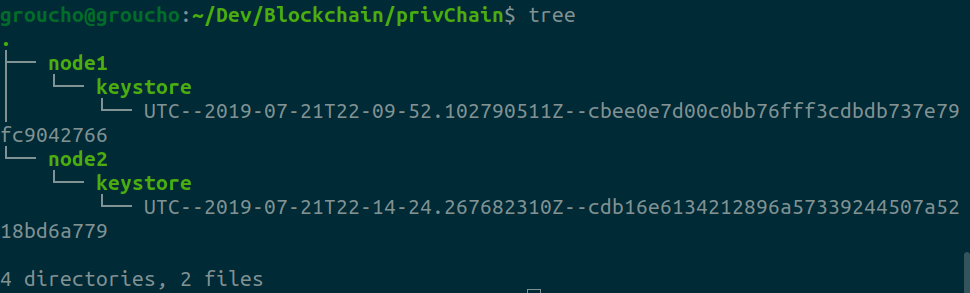
The two addresses we got from the previous steps are the following:
0xCBeE0E7d00C0bb76fFf3cdbdb737e79fC9042766  (node1)
0xcdB16e6134212896A57339244507a5218bd6a779 (node2)
Creation of configuration file using puppeth
The previous steps gave us two addresses, one for each node.
We can now use puppeth to create a JSON configuration file that is going to be used to initialize the genesis block.
As previously sad, the address created in node1 will be use as our chain validator. As such, it will be the only one entitled to seal new blocks.
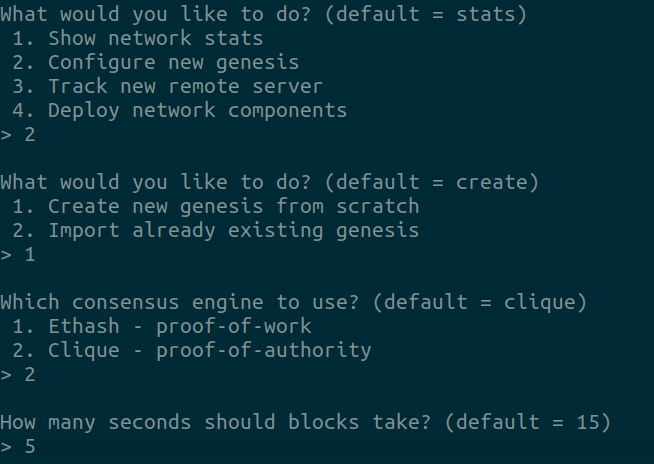
Trough the puppeth command we are going to:
- ask for the creation of a new genesis configuration file
- pick a consensus algorithm (here Clique for POA)
- decide the mining(sealing) time
- decide which account is able to add new blocks
- prefund accounts as liked
- export the config file with the previous settings
The following screenshots illustrate the steps to perform all of the above
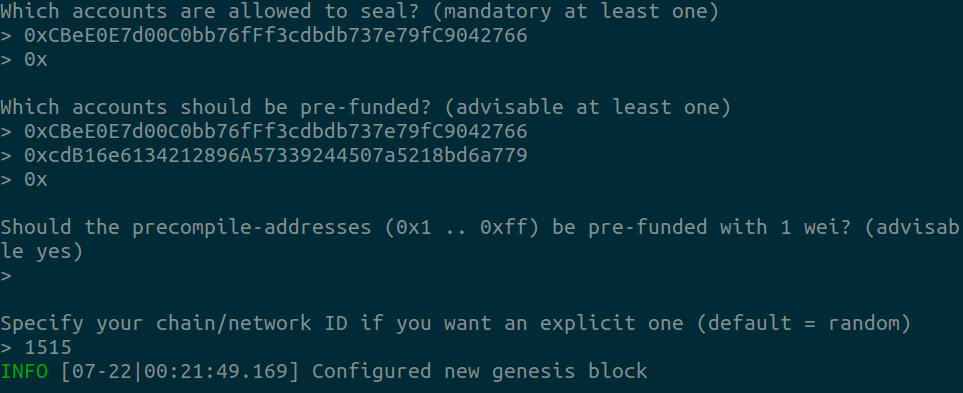
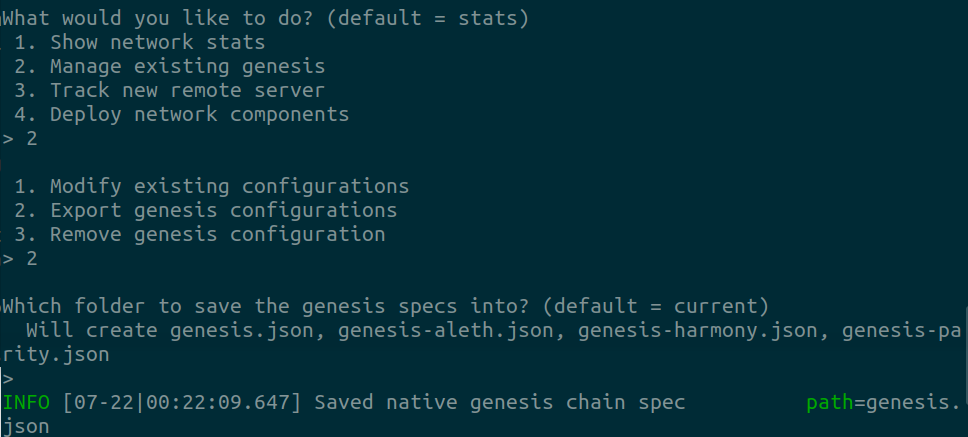
All this process should result in a genesis.json file.
This will include, apart from the ones already specified, lots of other accounts.
Since at the moment we do not need all of these accounts we are going to remove the ones automatically created by puppeth.
For the purpose of our example we are going to modify the Json as following:

We are not going deeper in the description of the fields. Please refer to the Ethereum documentation for more info.
Node initialization using configuration file
We are now going to create our two nodes. Both of them will share the same genesis file we just created.
The following commands will serve to our purpose:
geth --datadir node1/ init genesis.json
geth --datadir node2/ init genesis.json
This will set our nodes up creating all the chain data in sub-directories (geth folder)
The accounts we have created so far are still locked, meaning that they are not yet able to operate on our Blockchain ecosystem. As locked they can still receive funds, in case, but they are not allowed to send transactions to the ledger.
We are going to unlock the account as soon as the node will be scheduled to run. An alternative could be unlock the account using the relevant API while attaching to the node.
In order to perform the unlock through HTTP we need to use the option of “allow-insecure-block”, being the RPC over HTTP seen as unsafe due to the potential connection of external sources to the node. For the purpose of the tutorial here we are going to allow for such an option in order to unlock the account as soon as the node runs.
Instead of directly providing the password at startup we save it in a text file. This is to avoid that the password could be saved in any of the logs of the console.
Indeed, in order to unlock the account at the same time we are going to run the node, we save its keyword in node1/password.txt_.
We now start our first node creating and executing a bash file startNode1.sh that contains the following geth command:
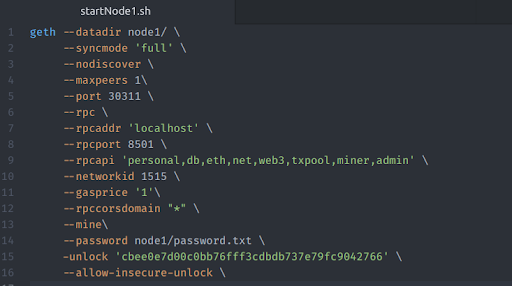
As far as the options chosen here we suggest the reader to check the geth documentation for a detailed exposition. We just want to focus on the following ones:
- –nodiscover: force to add peers manually through their enode identifiers;
- –rpc, –rpcaddr, –rpcport: allow for RPC connection and specify the main setups;
- –rpcapi: lists which API will be available for calls over the RPC protocol;
- –rpccorsdomain: specify from which cross domain RPC requests can be sent.
We are allowing for all since we will interact to our node from various sources.
Creating a startNode2.sh in the same way we just did for node1 will result in a script to run also node2. We just need to change the ports (–rpcport,–port) that have been already assigned to node1.
Make the two nodes know each other
From the previous steps we get two nodes that have been initialized using the same genesis state and two bash scripts containing the geth command to run them both.
But this is not enough for us. They are not aware of the existence of each other.
Therefore if we were going to run both the nodes, they will have two different histories.
We want more. We want that both the nodes interact and share their status.
We are going to connect the two nodes through their enodes. These being their identifiers, a sort of IP address for nodes.
The enode can be retrieved either at startup of the node (among all the information being printed) or through the geth cli while attaching to the node. In the last case the command is:
admin.nodeInfo.enode
In order to run the previous command we need to specify at the startup of the node that among the rpcapi we are going to open there is also admin.
This is not secure to use in production. If for any reason a malicious user could attach to our node then she can run admin procedures. Therefore we should be careful to open the admin API over RPC-HTTP.
In our case, we retrieve the enode for node1 in the printed log while launching the command to start the node.

Once we have both the enodes they are to be saved in a file static-nodes.json.
Such file is going to be placed in the subfolder of the nodes. Actually it is sufficient that only one node knows the list of all the ones composing the ecosystem.
In our example we are going to create a node1/static-nodes.json with the following enodes
"[

  "enode://c91697f6f5cfd4f7c1f84abd577ba194e95de079c21d0cd78a708d17a4c8e72dbea271e2c2f97c87ee40626c6ec82d2360753086412d8fd83dad0ef68b545029@[::]:30312?discport=0",


  "enode://85b2d51e88b77a4ee2ab916b14f23b01a69ee4cf74836b0927a68ba547303e41752b679bd4f50f92c4b0828da97ec3a0fac94a587b5e82a0cb9d65ce96abb2cf@[::]:30311?discport=0"

]"
# just copy the content inside "" into a json new file
Where, in this case, in place of [::] we write the ip address assigned to our localhost.
We recall that at the stage of creation of the configuration file the account that was allowedscr to seal was the one created in node1, therefore we should expect a failure when an account that is not authorized tries to seal a block.
We can see this happening in the logs concerning node2, where there is no address with such a persmission:

Run the nodes and attach to them (geth)
We run both node1 and node2 using the bash scripts startNode1.sh and startNode2.sh just created previously. When both the nodes are running we should expect node2 to import the blocks that were mined by the account operating in node1 and allowed to seal.

Once the nodes are running we can connect to them using the attach option for the geth command. We can either provide their running http address with the relevant port or connect through IPC protocol using the geth.ipc file stored in the geth folder. In the latter case the command to be launched is: geth attach node1/geth.ipc.
The same to attach for node2, we just need to link to the relevant ipc file.
Once attached to the nodes we will have access to the geth console. Here we are granted permission only to call the API methods being opened while starting the node.
In our case, using the procedures provided at node startup we could check that both the nodes have the same block counts and that they are peers of the same network. Indeed, looking at their enodes and the ones of their peers we can see that they are aware of each other, as shown in the following picture
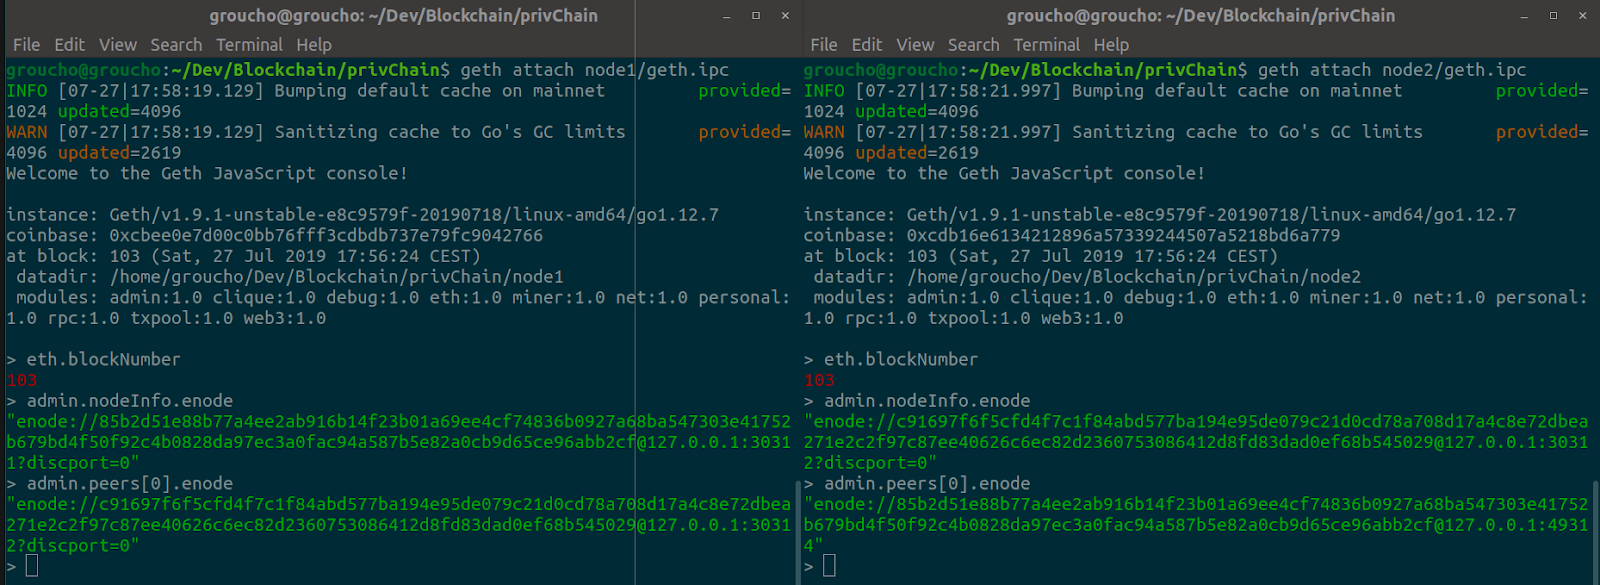
In the above we see that node1 (left) has in its peers the enode of node2(right).
Allow mining only when pending transactions
From the verbosity of the log been shown in the console while running the node, we can see that mining(or sealing in this case) is happening independently on whether there is or not a transaction to be mined.
Therefore the setup seen above has a shortcoming. It is, indeed, adding blocks with void info to the chain. If we do want to mine just when necessary, that is as soon as a transaction is in pending state, then an ad-hoc JS file will serve our purpose.
We can use the preload command of the geth CLI when attaching to the node in order to embed the procedures of an external JS file.
Remove the –mine option from startNode1.sh.
Create a new JS file with the following code
var mining_threads = 1

function checkWork() {
    if (eth.getBlock("pending").transactions.length > 0) {
        if (eth.mining) return;
        console.log("== Pending transactions! Mining...");
        miner.start(mining_threads);
    } else {
        miner.stop();
        console.log("== No transactions! Mining stopped.");
    }
}

eth.filter("latest", function(err, block) { checkWork(); });
eth.filter("pending", function(err, block) { checkWork(); });

checkWork();
name it, for instance, “mineWhenNeeded.js”.
Lunch the following command:
geth attach node1/geth.ipc --preload "mineWhenNeeded.js"
Now we should see that just when a transaction is made the account entitled to seal will start its activities.
Transactions between accounts
We create a new account in node2 that will receive ethers from the address we have already created and recharged at startup of node2 (intra-node transaction)
After the attach to node2 we create a new account using the geth cli and personal API
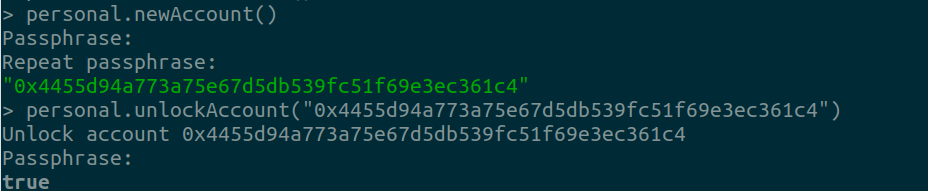
Send 10 eth to the newly created account

We get back the hash of the transaction 0x4455d94a773a75e67d5db539fc51f69e3ec361c4
We need to wait that such a transaction is included in a block sealed into the chain in order to see the amount of eth being charged.

Indeed the transaction is still pending as shown in the following
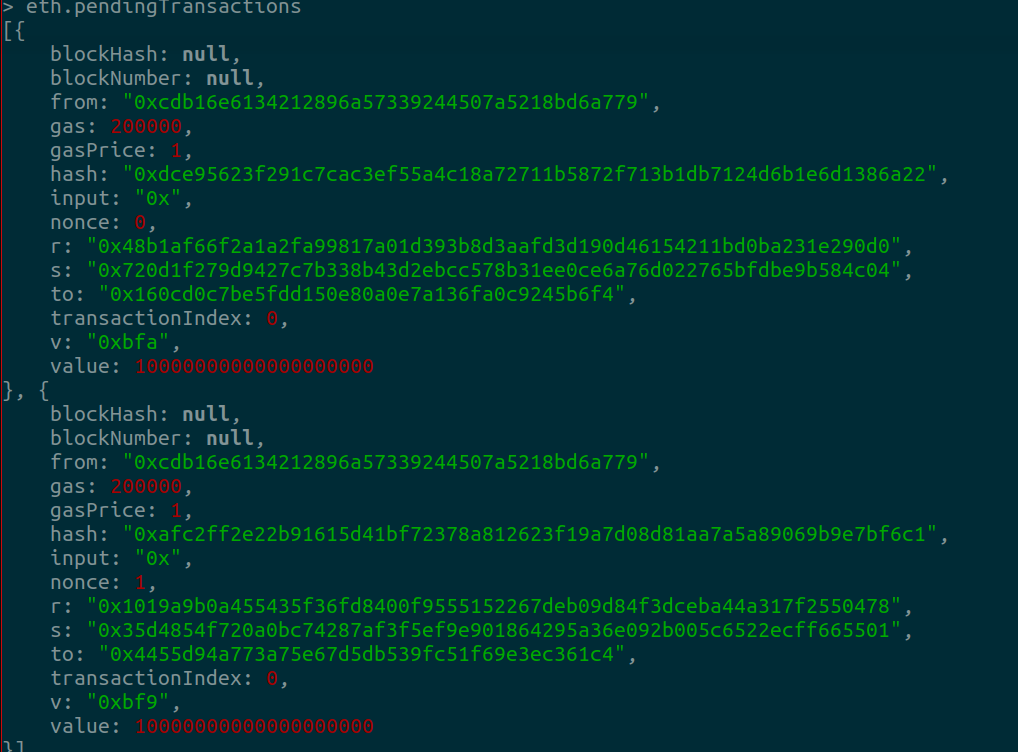
Once the transaction is placed in a block and sealed, then we see that no more transactions are pending

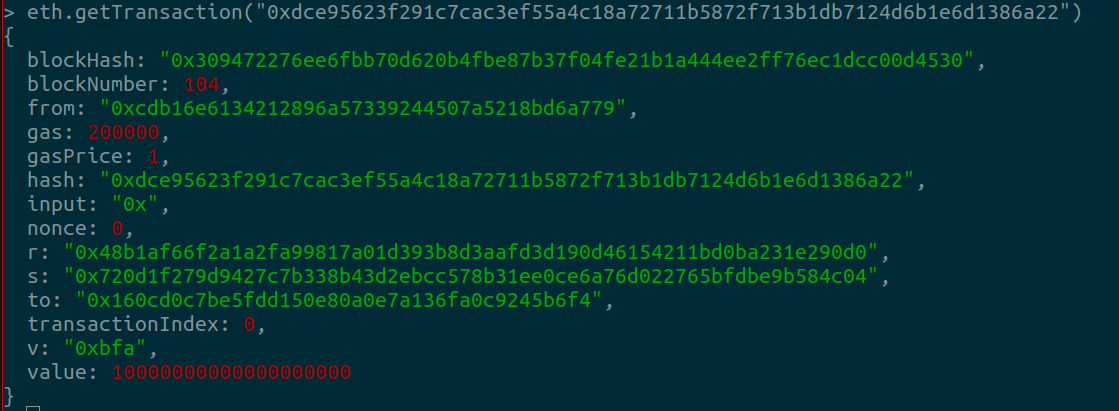
Now when we search for the hash of the transaction we can see that it was included in the block mined as the 104th of the chain
The procedures for creating an account in node1 and then send eth to it from node2 is similar to what we have just done. We invite the reader to play with it.
Up to this point we expect to see the following folders’ tree structure
Connect the node with Metamask
We want now to connect our running node to Metamask. This, working as a wallet, will generate its own addresses and store their keys inside the application.
In the addon we ask for the creation of a new custom RPC client. We are going to connect to node1 by providing the ip and port on which the node is running.
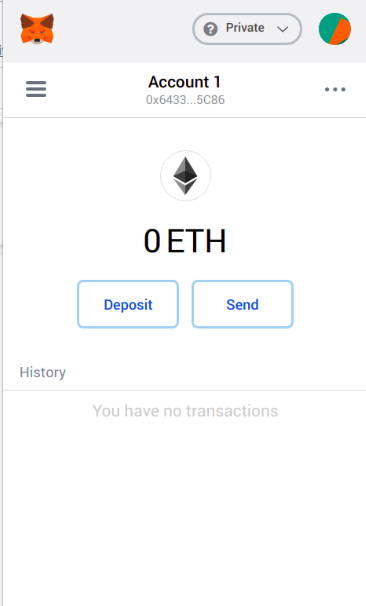
It shows us a new account with a balance of 0 eth
0x643398AeCD618faE5Dc1a456675b87ad5d6F5C86
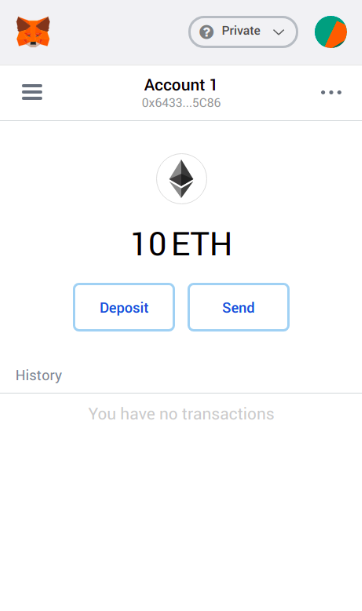
We are going to send 10 eth to this account using one of our available addresses through the geth console

After we have done we see that the account in the Metamask wallet is charged
We can now use Metamask to send, for instance, ether to an account.
In order to show the interoperability of all these tools, let’s create an ad-hoc account on node2 using the geth console and try to send 5 ether to it using Metamask.
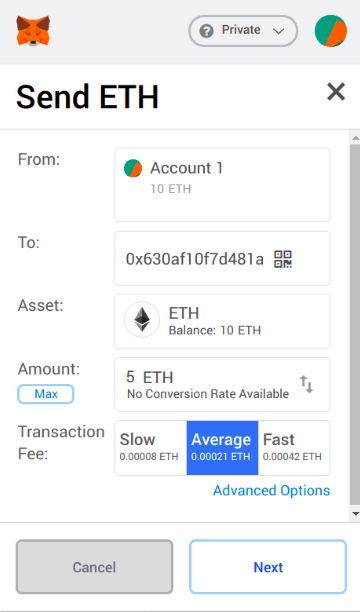
And we can check that the transaction is successfully executed

Attach the node using Remix
We are now going to connect the Remix IDE to our node. Remix doesn’t work as Metamask does. It will not create an ad-hoc wallet but it will allow us to manage the accounts created throug geth.
Therefore we expect to see in Remix the same accounts we find in the node we attach to.
We just a create a bunch of addresses in geth to show that they are the same of the ones showed by remix.
In the Remix run tab we choose Web3 Provider as the environment. At popup we insert the address we want to connect to, that is the ip:port address that is hosting our private node.

Conclusions
In this walkthrough we saw how to create a two-node ETH private chain.
Before the node initialization we decided to use puppeth in order to build the json configuration file
We wrote a script collecting the geth command with all the desired options to run the node once initialized.
We explored different ways to interact with our chain. Namely the geth console, the Remix IDE and the Metamask Wallet.